
2021. 6. 8. 17:23ㆍ🔴 Angular/NgRx
NgRx(state management with actions & reducers)
= RxJs(Observables) + Redux
redux에서 영향을 받아 reactive한 어플리케이션을 만들 수 있도록 하는 프레임워크
즉, Redux의 상태관리 패턴을 앵귤러에도 적용시키고
동시에 RxJs를 사용하여 state의 Observable을 쉽게 가공할 수 있다.
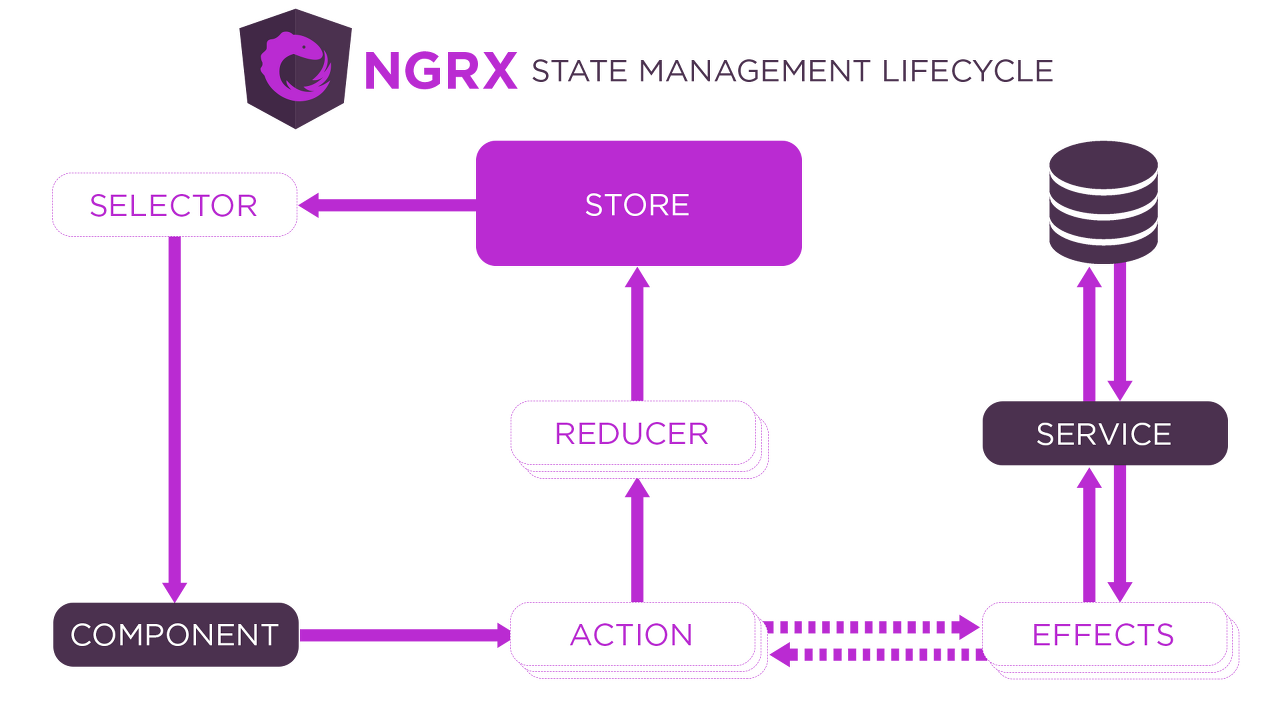
컴포넌트에서 입력받은 값을 api통신을 거쳐 어떻게 뷰에 반영이 되는지
위의 다이아그램을 부분적으로 살펴보며 알아보자.
1. ACTION

- 어플리케이션 내에 발생되는 이벤트들을 기재해놓은 곳
- 사용자 인터렉션, 네트워크 요청을 통한 외부 상호작용, API와의 통신 등 모두 action에 적혀 있음
- 따라서 어플리케이션 내에서 어떤 이벤트들이 어떻게 관리되고 있는지 action을 통해 알 수 있음
interface Action {
  type: string;
}
Action은 사실 간단한 인터페이스로 구성되어있다.
여기서 'type'은 '[Source] Event'의 형태로 쓰이는데, 해당 action이 어떤 이벤트인지 간단히 설명해준다.
여기에 우리는 상황에 따라 속성들을 추가하여 action에 추가적인 내용이나 메타데이터를 넣을 수 있다.
{
  type: '[Login Page] Login',
  username: string;
  password: string;
}
type을 보면 이 action은 로그인 페이지에서 로그인을 했을 시 쓰인다는 것을 알 수 있다.
그리고 username과 password를 추가적으로 받고 있다는 것도 확인할 수 있다.
Action은 createAction()을 통해 생성 할 수 있다.
(createAction()은 Action 인터페이스 형태의 object를 반환해주는 Creator function을 만들어준다)
아래와 같이 상황에 따라 action creator를 다르게 만들 수 있다 :
1) 추가적인 메타데이터 없는 action creator
export const increment = createAction('[Counter] Increment');2) 추가적인 메타데이터 있는 action creator
export const loginSuccess = createAction(
  '[Auth/API] Login Success',
  props<{ user: User }>()
);
props에 해당 action에서 추가적으로 필요한 메타데이터를 알려주고 있다.
3) function이 있는 action creator
export const loginSuccess = createAction(
  '[Auth/API] Login Success',
  (response: Response) => response.user
);
해당 action에서 response를 전달받으면, response.user를 반환한다.
앞서 다이아그램에서는 (1) component -> (2) action 순으로 그려져 있는데,
action을 생성하는 것은 위에서 다뤘으니 component에서 action을 dispatch하는 법을 알아보자
<login-page.component.ts>
store.dispatch(increment());store.dispatch(loginSuccess({ user: newUser }));추가적인 메타데이터가 필요한 경우 두번째 예시처럼 데이터를(newUser) 넣어주면 된다.
2. EFFECTS
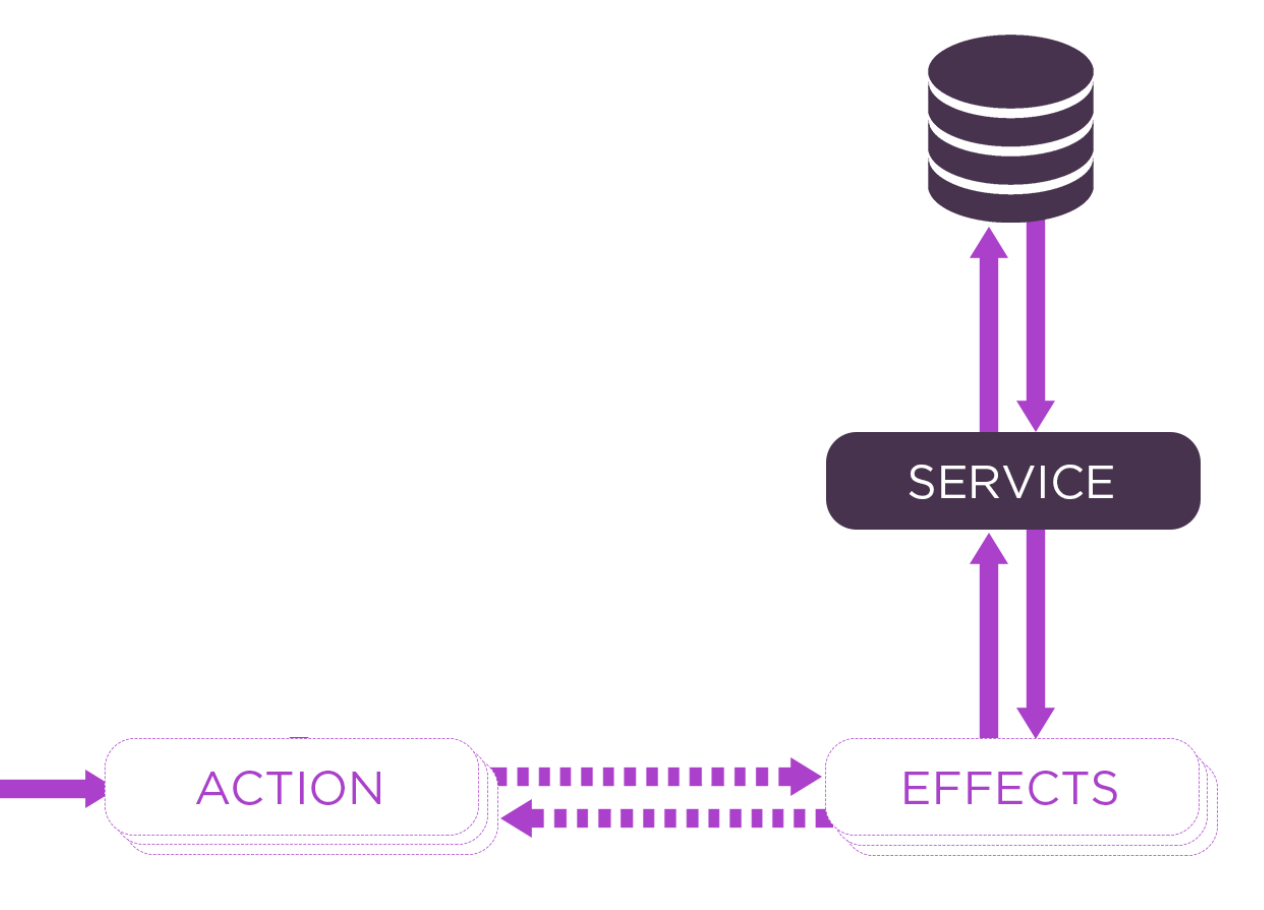
- 서비스와 이어져있어 api통신을 함
- 'Side Effect Model'!
Side Effect Model :
먼저 프로그래밍에서 'side effect'란 단순히 '부작용'이라는 뜻이 아니라, 어떠한 상태가 변화하는 것을 말한다.
즉, 변수의 값을 변경한다든지, UI에서 버튼을 disable로 바꾼다든지 이러한 변화들을 가리킨다고 볼 수 있다.
( 참고 : https://softwareengineering.stackexchange.com/questions/40297/what-is-a-side-effect )
따라서 여기서는 Side Effect를 '부수효과'라고 부르기로 한다.
NgRx의 Effect는 이러한 부수효과들을 방지하며 개발할 수 있도록 해준다.
만약 Effect가 없다면 컴포넌트가 직접 서비스와 연결되어 외부 통신을 통해 데이터를 받아와야 한다. 이렇게 받아온 데이터를 다루는 상황에서 부수효과가 발생하는 시점이 일어난다.
Effect는 서비스와 컴포넌트 사이에 위치하여 서비스와 상호작용하는 길이 되어주고, 컴포넌트 & 서비스 사이를 끊어내어 컴포넌트가 api통신에 직접적으로 관여하지 않도록 해준다.
(전) Component - Service => (후) Component - Effect - Service
Effect 는 주입 가능한 (Injectable) 서비스로써, 아래 몇 가지 특징이 있다 :
1. 'Actions 서비스'는 최근 state가 업데이트 되고 난 뒤 모든 action들을 observable stream형태로 전달해준다.
2. createEfftect() 함수를 통해 메타데이터는 observable stream에 붙는다. 여기서 메타데이터는 store에 구독된 streams를 등록하는 데에 쓰인다. effect stream이 반환하는 action들은 다시 store에 돌려보내진다.
3. Action은 'ofType()'으로 구분된다. ofType()은 한 개 또는 여러 개의 action들을 인자를 받아 필터링을 한다.
4. Effect는 store observable을 구독하고 있다.
5. 우리는 effect에 service를 inject하여 외부API 통신을 할 수 있다.
<movie.effects.ts>
import { Injectable } from '@angular/core';
import { Actions, createEffect, ofType } from '@ngrx/effects';
import { EMPTY } from 'rxjs';
import { map, mergeMap, catchError } from 'rxjs/operators';
import { MoviesService } from './movies.service';

@Injectable()
export class MovieEffects {

  loadMovies$ = createEffect(() => this.actions$.pipe(
    ofType('[Movies Page] Load Movies'),
    mergeMap(() => this.moviesService.getAll()
      .pipe(
        map(movies => ({ type: '[Movies API] Movies Loaded Success', payload: movies })),
        catchError(() => EMPTY)
      ))
    )
  );

  constructor(
    private actions$: Actions,
    private moviesService: MoviesService
  ) {}
}
위 effect 예시는 다음과 같은 흐름으로 동작한다 :
1. loadMovies$ effect은 Actions 스트림을 통해서 오고 가는 action들을 구독하고 있다.
2. 하지만 ofType으로 '[Movies Page] Load Movies'로 지정했기에 해당 액션만 필터링해서 구독한다.
3. mergeMap()을 사용하여 action 스트림을 새로운 observable으로 제조한다.
4. movicesService.getAll()로 API통신을 한다.
- 성공 시 새로운 action으로 map()한 observable를 리턴한다.
- 실패 시 빈 observable를 리턴한다.
5. 이렇게 새로 만들어진 action은 Store로 전달된다. 그리고 state 변경이 필요할 때 reducer은 해당 action을 다룬다.
3. REDUCER

- state의 변화를 담당함
- action의 타입에 따라 어떤 action에 의해 state를 변화시켜야 하는지 정함
- 항상 같은 input에 같은 output을 내보낸다는 점에서 '순수 함수'라고 볼 수 있음 (=부수효과를 발생시키지 않음, 외부 상태에 의존적이지 않음)
- 가장 최근에 dispatch된 action과 state를 가지고 새롭게 변경한 state를 반환할지 기존 state를 반환할 지 정함
ACTION -> dispatched! --> REDUCER ( = action에 대한 listener)
1. state shape 잡기
<scoreboard.reducer.ts>
import { Action, createReducer, on } from '@ngrx/store';
import * as ScoreboardPageActions from '../actions/scoreboard-page.actions';

export interface State {
  home: number;
  away: number;
}
2. state 초기값 정하기
export const initialState: State = {
  home: 0,
  away: 0,
};
state가 undefined일 경우 초기값에 따라 정해진 값을 줄 수 있다.
3. reducer function 만들기
const scoreboardReducer = createReducer(
  initialState,
  on(ScoreboardPageActions.homeScore, state => ({ ...state, home: state.home + 1 })),
  on(ScoreboardPageActions.awayScore, state => ({ ...state, away: state.away + 1 })),
  on(ScoreboardPageActions.resetScore, state => ({ home: 0, away: 0 })),
  on(ScoreboardPageActions.setScores, (state, { game }) => ({ home: game.home, away: game.away }))
);

export function reducer(state: State | undefined, action: Action) {
  return scoreboardReducer(state, action);
}
- createReducer() : action들을 통해서 state를 다룰 수 있게 한다.
- initialState : 위에서 정한 초기값
- on() : action에 따라 어떻게 state를 다룰 것인지 정한다 (= 각 action에 대한 불변의 transition)
immutable transition :
기존의 state를 변경하는 것이 아니라 spread operator를 통해 새로운 state를 반환한다 (= purity of change 유지!)
하지만 spread operator은 shallow copy를 하기 때문에 불변성을 유지하기 위해선 deep copy가 필요하다. (loadsh나 immer과 같은 라이브러리를 사용하면 쉽게 deep copy를 할 수 있다)
4. STORE

- Redux의 영감을 받음, global하게 state을 관리함
- Angular의 상단에 위치한 state 관리자로써 일관성 있는 어플리케이션을 만들 수 있도록 함
AppModule에 StoreModule를 import해야지 어플리케이션 내에서 Store를 사용할 수 있다.
<app.module.ts>
import { BrowserModule } from '@angular/platform-browser';
import { NgModule } from '@angular/core';

import { AppComponent } from './app.component';

import { StoreModule } from '@ngrx/store';
import { counterReducer } from './counter.reducer';

@NgModule({
  declarations: [AppComponent],
  imports: [BrowserModule, StoreModule.forRoot({ count: counterReducer })],
  providers: [],
  bootstrap: [AppComponent],
})
export class AppModule {}
StoreModule.forRoot()에 state를 관리하는 'counterReducer'를 count라는 이름으로 등록하였다. StoreModule.forRoot()은 글로벌한 provider를 등록시켜주기 때문에 어플리케이션 내에 어디서나 Store에 접근할 수 있다.
<my-counter.component.ts>
import { Component } from '@angular/core';
import { Store } from '@ngrx/store';
import { Observable } from 'rxjs';
import { increment, decrement, reset } from '../counter.actions';

@Component({
  selector: 'app-my-counter',
  templateUrl: './my-counter.component.html',
})
export class MyCounterComponent {
  count$: Observable<number>;

  constructor(private store: Store<{ count: number }>) {
    this.count$ = store.select('count');
  }

  increment() {
    this.store.dispatch(increment());
  }

  decrement() {
    this.store.dispatch(decrement());
  }

  reset() {
    this.store.dispatch(reset());
  }
}
MyCounterComponent 내에서 Store을 통해 'count state'에 접근하여 count$ stream에 해당 state를 연결하였다. 그리고 increment(), decrement(), reset() 함수 내에서 action들을 dispatch()하였다.
5. SELECTOR

- 원하는 조건에 맞춰 state의 일부분을 가져올 수 있는 순수 함수임
- 특징 : portability, memoization, composition, testability, type saftey
createSelector(), createFeatureSelector() 함수는 가장 최신 인자들을 추적하고 있다. 만약 직전의 인자와 동일한 인자로 selector 함수를 호출하면, selector은 순수 함수이기 때문에 해당 함수를 재호출할 필요 없이 결과값을 가져올 수 있다. 이는 퍼포먼스적인 장점으로 볼 수 있으며, 이러한 행위는 'memoization'이라고 부른다.
memoization :
컴퓨터 프로그램이 동일한 계산을 반복해야 할 때, 이전에 계산한 값을 메모리에 저장함으로써 동일한 계산의 반복 수행을 제거하여 프로그램 실행 속도를 빠르게 하는 기술이다. (참고 : https://drehzr.tistory.com/77)
1. 1 selector -> 1 piece of state 가져오기
<index.ts>
import { createSelector } from '@ngrx/store';

export interface FeatureState {
  counter: number;
}

export interface AppState {
  feature: FeatureState;
}

export const selectFeature = (state: AppState) => state.feature;

export const selectFeatureCount = createSelector(
  selectFeature,
  (state: FeatureState) => state.counter
);
createSelector : 동일한 state 내에서 여러 조각들을 골라 필요한 데이터를 가져온다.
2. 여러 개 selectors -> 여러개 pieces of state 가져오기
<index.ts>
import { createSelector } from '@ngrx/store';

export interface User {
  id: number;
  name: string;
}

export interface Book {
  id: number;
  userId: number;
  name: string;
}

export interface AppState {
  selectedUser: User;
  allBooks: Book[];
}

export const selectUser = (state: AppState) => state.selectedUser;
export const selectAllBooks = (state: AppState) => state.allBooks;

export const selectVisibleBooks = createSelector(
  selectUser,
  selectAllBooks,
  (selectedUser: User, allBooks: Book[]) => {
    if (selectedUser && allBooks) {
      return allBooks.filter((book: Book) => book.userId === selectedUser.id);
    } else {
      return allBooks;
    }
  }
);
AppState 내에 'selectedUser'라는 객체와 'allBooks'라는 Book 리스트가 있다.
그리고 createSelector을 통해서 우리는 현재 사용자에게 속한 모든 책들을 보여줄 수 있다.
이를 통해 필터링해서 가져오는 데이터는 항상 최신 상태를 유지하기 때문에 (always up to date!)
조건에 따라 (사용자가 유무에 따라) 상황에 맞게 가장 최신의 책 리스트를 불러올 수 있다.
이런 식으로 원하는 데이터를 자유롭게 selector로 state에서 가져와서 뷰에 보여주면 된다.
ngOnInit() {
  this.counter = this.store.select(exampleSelector.selectFeatureCount)
}
참고: ngrx documentation (https://ngrx.io/docs)