
2021. 11. 9. 16:10ㆍ🔴 Angular

앵귤러로 UI 개발을 하면서 개발자 도구를 켜보면 'ng-component'라는 게 자동으로 만들어져 있는 것을 발견할 수 있다.
앵귤러는 <router-outlet> 디렉티브를 통해 컴포넌트들을 렌더링 해주는데,
이때 <ng-component></ng-component> 안에다가 자동으로 라우팅 된 컴포넌트를 그려 넣는다.
다시 말해서, ng-component는 삽입되는 엘리먼트의 기본 태그 이름이다.
Routable View Components Don't Need Selectors In Angular 4.4.4 - But They May Be Helpful
Ben Nadel demonstrates that routable View components don't need to have Selectors in Angular 4.4.4. But, they are available; and, they me be helpful for debugging and styling purposes. It's good to know that the option exists should you want to leverage it
www.bennadel.com
앵귤러에서 라우팅 할 때 컴포넌트를
DOM에 추가하는 동작을 간단히 살펴보기 위해 위의 글을 정리해보았다.
라우팅 되는 뷰 컴포넌트들은 따로 selector가 필요하지 않지만, 때로는 selector를 지정하는 것이 도움이 될 수도 있다.
일반적으로, 앵귤러 디렉티브는 @Component()나 @Directive()의 메타데이터에 selector를 지정해야 한다.
그래야 템플릿을 파싱할 때 앵귤러가 HTML 엔티티들을 알맞은 디렉티브와 함께 위치를 잡아줄 수 있다.
반대로 Router와 rouer-outlet 디렉티브들에 의해 삽입되는 (라우팅 가능한)컴포넌트에는 selector를 지정하지 않아도 된다.
하지만 selector은 겹겹이 싸인 뷰를 랜더링하는 로직들을 좀 더 쉽게 디버깅할 수 있도록 도와주기도 한다.
데모 페이지를 통해 위에 설명한 부분들을 좀 더 자세히 알아보도록 하자 :
http://bennadel.github.io/JavaScript-Demos/demos/routable-view-selectors-angular4/#/
Routable View Components Don't Need Selectors In Angular 4.4.4
bennadel.github.io
라우팅 가능한 컴포넌트가 부모 뷰에 삽입될 때, 앵귤러 Router는 이를 마크업의 한 부분으로 삽입해야 하기 때문에 해당 컴포넌트는 결국엔 랜더링된 DOM의 한 부분으로 그려진다. 만약 라우팅 되는 컴포넌트에 selector가 있다면, 앵귤러는 selector를 가지고 요소 노드를 생성할 것이다. 반대로, 컴포넌트에 selector가 없다면 앵귤러는 삽입된 엘리먼트의 태그 이름을 'ng-component'라고 지정할 것이다.
이러한 현상을 보기 위해 하나의 router-outlet가 2가지 다른 뷰 컴포넌트를(AViewComponent, BViewComponent) 스위치 하며 보여줄 수 있는 앵귤러 애플리케이션을 만들었다. (데모 페이지 참고)
먼저 AViewComponent부터 코드를 살펴보자 :
// Import the core angular services.
import { Component } from "@angular/core";

// ----------------------------------------------------------------------------------- //
// ----------------------------------------------------------------------------------- //

@Component({
	// NOTE: Since routable views aren't embedded in template logic, we don't need to
	// provide a SELECTOR - Angular will inject this component automatically as part
	// of the router-outlet logic (using the "ng-component" tag).
	styleUrls: [ "./a-view.component.css" ],
	template:
	`
		<h3>
			A-View Component
		</h3>
		<p>
			This is the a-view component, noice!
		</p>
	`
})
export class AViewComponent {
	// ...
}
코드에서 볼 수 있듯이, view의 @Component()의 메타데이터에는 'selector'가 지정되어있지 않았다.
라우팅 되는 컴포넌트에서는 selector를 설정할 필요가 없지만 사용할 수는 있다.
이를 염두해보며 아래 BViewComponent를 살펴보자 :
// Import the core angular services.
import { Component } from "@angular/core";

// ----------------------------------------------------------------------------------- //
// ----------------------------------------------------------------------------------- //

@Component({
	// For this routable component, we're going to include a SELECTOR even though it
	// isn't strictly necessary (so that we can see how the view output is affected).
	selector: "b-view",
	styleUrls: [ "./b-view.component.css" ],
	template:
	`
		<h3>
			B-View Component
		</h3>
		<p>
			This is the b-view component, sweet!
		</p>
	`
})
export class BViewComponent {
	// ...
}
@Component() 메타데이터 안에 'b-view'라는 selector가 지정되어 있다.
브라우저에서 이 데모 애플리케이션을 실행하고, AViewComponent를 열면 아래와 같은 DOM으로 랜더링 되는 것 볼 수 있다.
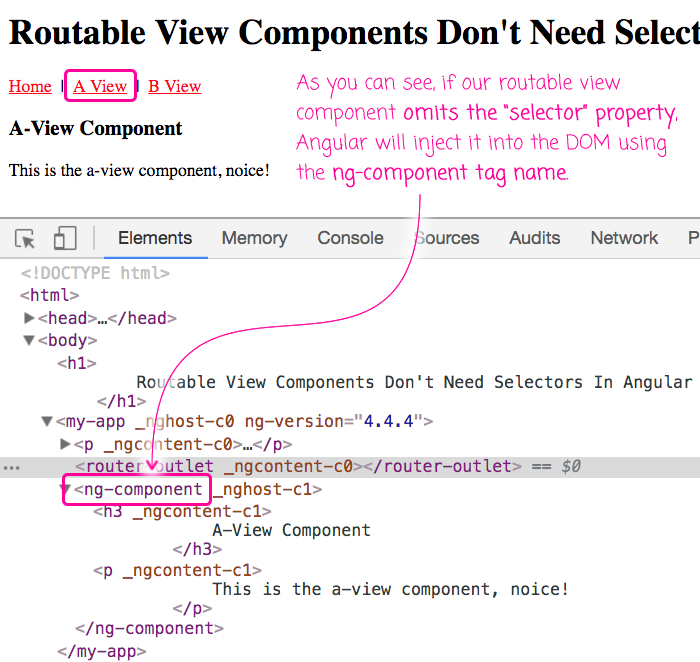
AViewComponent는 'ng-component'라는 엘리먼트 태그 이름으로 DOM에 삽입되었다.
만약 BViewComponent로 가면 아래와 같은 DOM을 확인할 수 있다.
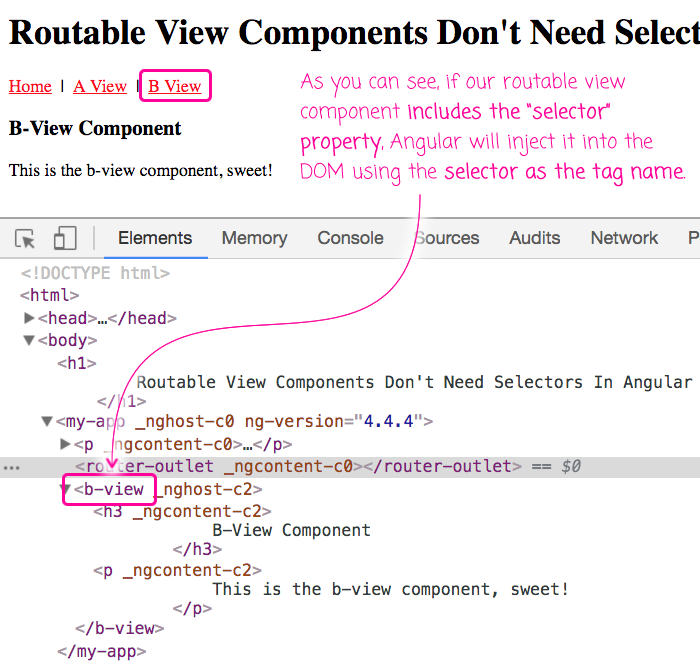
이번에는 컴포넌트 내에서 지정했던 'b-view'라는 selector가 DOM에 삽입되었다.
이 2개의 라우팅 가능한 컴포넌트는 화면에 똑같은 결과로 나온다. 둘 다 랜더링이 되고, 컴포넌트의 CSS가 성공적으로 적용이 된다.
참고로 ':host'는 엘리먼트의 태그 이름에 묶여있지 않기에 영향받지 않는다.
하지만 selector를 지정하는 것은 개발자들에게 도움이 된다. 크롬 개발자 도구를 통해 엘리먼트들을 분석할 때, 'ng-content' 엘리먼트들로 이루어져 있는 트리구조는 직관적이지 않아 라우팅 된 애플리케이션을 디버깅하기 어렵기 때문이다.
또한 selector은 부모 컴포넌트 안에서 스타일을 더 쉽게 override 하도록 도와주기도 한다.
우리는 'ng-component' selector에 직접 스타일을 적용할 수 있지만, 부모 컴포넌트가 여러 개의 router-outlet 엘리먼트들을 지니고 있을 수도 있기 때문에 고유한 특정 selector로 다루는 것이 CSS selectors가 더 직관적이다.
* 요약 :
라우팅 되는 컴포넌트에
1) selector 지정함 -> 해당 컴포넌트는 개발자가 정한 selector 이름으로 DOM에 삽입됨
2) selector 지정 안 함 -> 앵귤러가 해당 컴포넌트를 'ng-component'라는 이름으로 DOM에 자동 삽입함
본문에서 글쓴이는 라우팅 되는 컴포넌트에 무조건 selector를 부여해야한다고 주장하고 있지는 않는다.
다만, 개발자가 디버깅을 할 때 앵귤러가 자동으로 추가하는 ng-component보다는 개발자가 특정지은 selector가 더 직관적이기 때문에 라우팅되는 컴포넌트에 selector를 추가하는 것은 충분히 의미 있는 작업이라고 보고 있다.
https://stackoverflow.com/questions/57702828/what-is-ng-component-in-angular
'🔴 Angular' 카테고리의 다른 글
| [Angular] directive selector를 Input/Output alias로 사용하기 (custom directive) (0) | 2020.10.07 |
|---|---|
| angular에서 동적으로 컴포넌트 생성하자 - ApplicationRef (0) | 2020.09.01 |
| [Angular] 커스텀 컴포넌트에 데이터 양방향으로 바인딩하는 방법 (1) | 2020.07.13 |
| RxJS library - pipe (1) | 2020.02.13 |
| [Angular] 아키텍쳐 정리 : 개요-모듈-컴포넌트-서비스/DI (0) | 2020.01.06 |