
2023. 10. 3. 22:03ㆍ🔴 React/Next.js
pre-rendering
Next.js의 모든 페이지는 기본적으로 사전 렌더링을 한다.
👉🏼 더 좋은 퍼포먼스
👉🏼 검색 엔진 최적화 (SEO)
pre-rendering의 2가지 렌더링 방식
둘의 차이는 = 언제 html 파일을 생성하는가?
1) 정적 생성 (static generation)
- 프로젝트 빌드하는 시점에 html 파일 생성
- 모든 요청에 파일들을 재사용함
- 퍼포먼스 이유로 next.js는 정적 생성을 권고함
- 정적 생성된 페이지들은 CDN에 캐시 됨
- 주요 함수 : getStaticProps, getStaticPath
2) server side rendering (SSR, dynamic rendering)
- 매 요청마다 html 생성
- 항상 최신 상태 유지
- 주요 함수 : getServerSideProps


server side rendering 적용 전
api 호출 후 → 페이지에 데이터를 넣어주는 방식
페이지 소스 보기
껍데기만 pre-rendering 된 상태이며, api 호출해서 얻은 데이터 정보는 들어가 있지 않다.
1-1. getStaticProps > 정적 생성 방식 사용 (목록 페이지)
<before>
export default function Page() {

    const [list, setList] = useState([]);

    const API_URL = process.env.NEXT_PUBLIC_API_URL as string;
    const getData = () => {
        Axios.get(API_URL).then((res: any) => setList(res.data));
    }

    useEffect(() => {
        getData();
    }, []);

 return (
     <div>
      <Head>
       <title>@제목제목@</title>
      </Head>
      <h1>This is Page Router Homepage!</h1>
         <ItemList list={list} />
     </div>
 )
}
useEffect()를 써서 페이지 진입 시, api 호출 후 데이터를 useState에 넣어주고 화면에 표시해 주었다.

JavaScript 차단한 상태에서는 목록 데이터가 표시되지 않는다.
<after>
export default function Page({list}: { list: any }) {
    return (
        <div>
            <Head>
                <title>@제목제목@</title>
            </Head>
            <h1>This is Page Router Homepage!</h1>
            {list && (<ItemList list={list}/>)}
        </div>
    )
};

export const getStaticProps = async () => {
    const API_URL = process.env.apiUrl as string;
    const res = await Axios.get(API_URL);
    const data = res.data;

    // 응답 값을 Post에게 props로 넘겨줄 수 있음
    return {
        props: {
            list: data,
            name: process.env.name
        }
    }
}
'getStaticProps' 사용하여 응답 값을 props로 넘겨주어 화면에 데이터를 표시해 주었다.

JavaScript가 차단된 상태에서도 데이터가 정상적으로 표시되는 것 확인 가능하다.
또한, 페이지 소스 보기를 해보면 데이터들이 들어가 있다. 이는 미리 만들어진 static 한 html를 제공하고 있기 때문이다.
빌드해서 정적 생성된 파일 확인해 보기 :
npm run build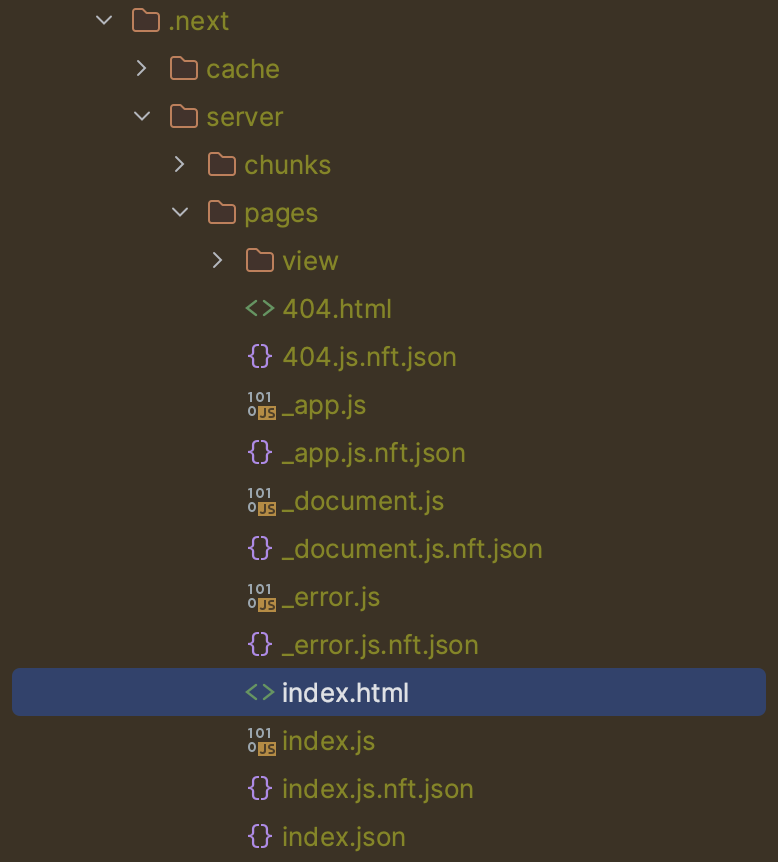
build 후, index.html이 생성되어 있는 것을 확인할 수 있다.
npm run start // 빌드된 파일 실행
index.html은 미리 만들어진 html이고, 캐싱되기 때문에 새로고침 할수록 로딩시간이 점점 짧아진다.
1-2. getStaticProps + getStaticPath > 정적 생성 방식 사용 (상세 페이지)
getStaticPath를 사용해서 dynamic path를 사용할 수도 있다.
export default ({item, name} : {item: any, name: string}) => {
    return (
        <>
            {item && (
                <>
                    <Head>
                        <title>{item.name}</title>
                        <meta name="desc" content={item.description} />
                    </Head>
                    {name} 환경임!
                    <Item item={item} />
                </>
            )}
        </>
    );
}

// dynamic paths
export const getStaticPaths = async () => {
    return {
        paths: [
            {params: {id: '495'}},
            {params: {id: '477'}}
        ],
        fallback: false
    };
}

export const getStaticProps = async(context: any  ) => {
    const id = context.params.id;
    const API_URL = `http://makeup-api.herokuapp.com/api/v1/products/${id}.json`;
    const res = await Axios.get(API_URL);
    const data = res.data;
    return {
        props: {
            item: data,
            name: process.env.name
        }
    }
}
id = 495, 477로 path를 미리 지정해 주면 아래와 같이 해당하는 정적페이지가 build시 미리 생성된다.
npm run buld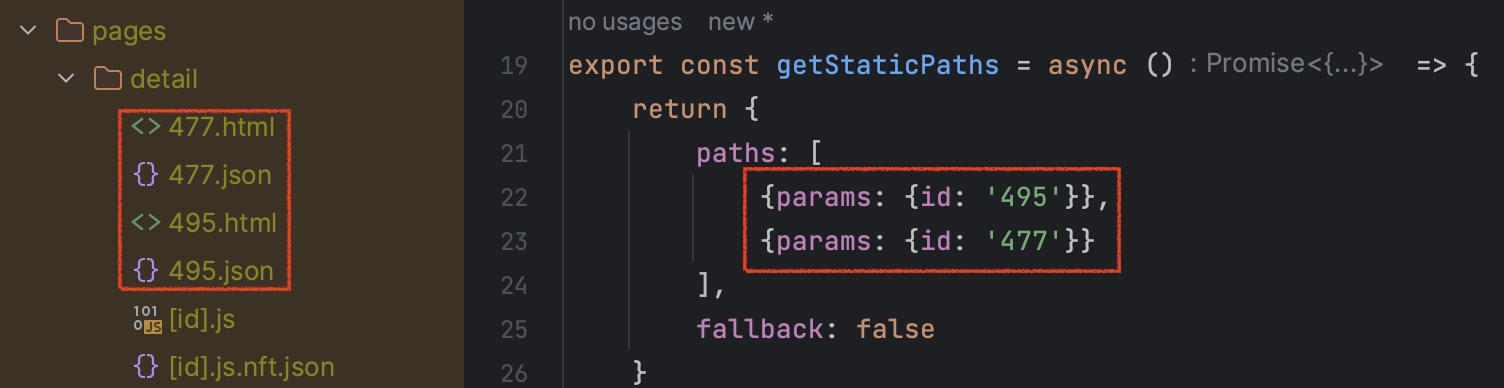
+ fallback 속성
fallback: falsegetStaticPaths 함수 내에서 fallback을 false로 주었는데, 이렇게 하면 495, 477 외 다른 아이템을 눌렀을 시 404 에러가 뜬다.
fallback: truetrue로 지정할 경우, 미리 지정한 id 외 다른 id의 상세페이지로 들어가면 pre-rendering 목록에 해당 상세페이지를 만들어놔서 그 후부터는 정적으로 생성된 페이지를 사용한다.

ex. path에 미리 지정한 477, 495 id 외에 488에 대한 상세페이지도 정적 파일로 생성되었다.
https://kkangdda.tistory.com/129
isFallback으로 로딩바 보여주기
https://nextjs.org/docs/pages/api-reference/functions/get-static-paths#fallback-pages Functions: getStaticPaths | Next.js Using Pages Router Features available in /pages nextjs.org next/router → router.isFallback으로 렌더링 인지 가능 const route
kkangdda.tistory.com
2. getServerSideProps > server side rendering 방식 사용 (상세 페이지)
title, meta에 api 호출 데이터의 name, description을 넣어서 SSR 전, 후를 비교하고자 한다.
<>
  <Head>
     <title>{item.name}</title>
     <meta name="desc" content={item.description} />
  </Head>
     <Item item={item} />
</>
<before>
export default () => {
    const router = useRouter();
    const {id} = router.query;

    const [item, setItem] = useState({});

    const API_URL = `http://makeup-api.herokuapp.com/api/v1/products/${id}.json`;

    const getData = () => {
        Axios.get(API_URL).then((res: any) => setItem(res.data));
    }

    useEffect(() => {
        if (id) {
            getData();
        }
    }, [id]);

    return <Item item={item} />;
}
예전과 같이, useEffect를 써서 api 호출 후 받은 데이터를 화면에 표시해 준다.
페이지 소스 보기

<title></title><meta name="desc" content=""/>title, meta 모두 비어있는 상태이다.
<after>
export default ({item} : {item: any}) => {
    return (
        <>
            <Head>
                <title>{item.name}</title>
                <meta name="desc" content={item.description} />
            </Head>
            <Item item={item} />
        </>
    );
}

export const getServerSideProps = async(context: any  ) => {
    const id = context.params.id;
    const API_URL = `http://makeup-api.herokuapp.com/api/v1/products/${id}.json`;
    const res = await Axios.get(API_URL);
    const data = res.data;

    // 응답 값을 Post에게 props로 넘겨줄 수 있음
    return {
        props: {
            item: data
        }
    }
}
'getServerSideProps' 사용하여 응답 값을 props로 넘겨주어 화면에 데이터를 표시해 주었다.
페이지 소스 보기

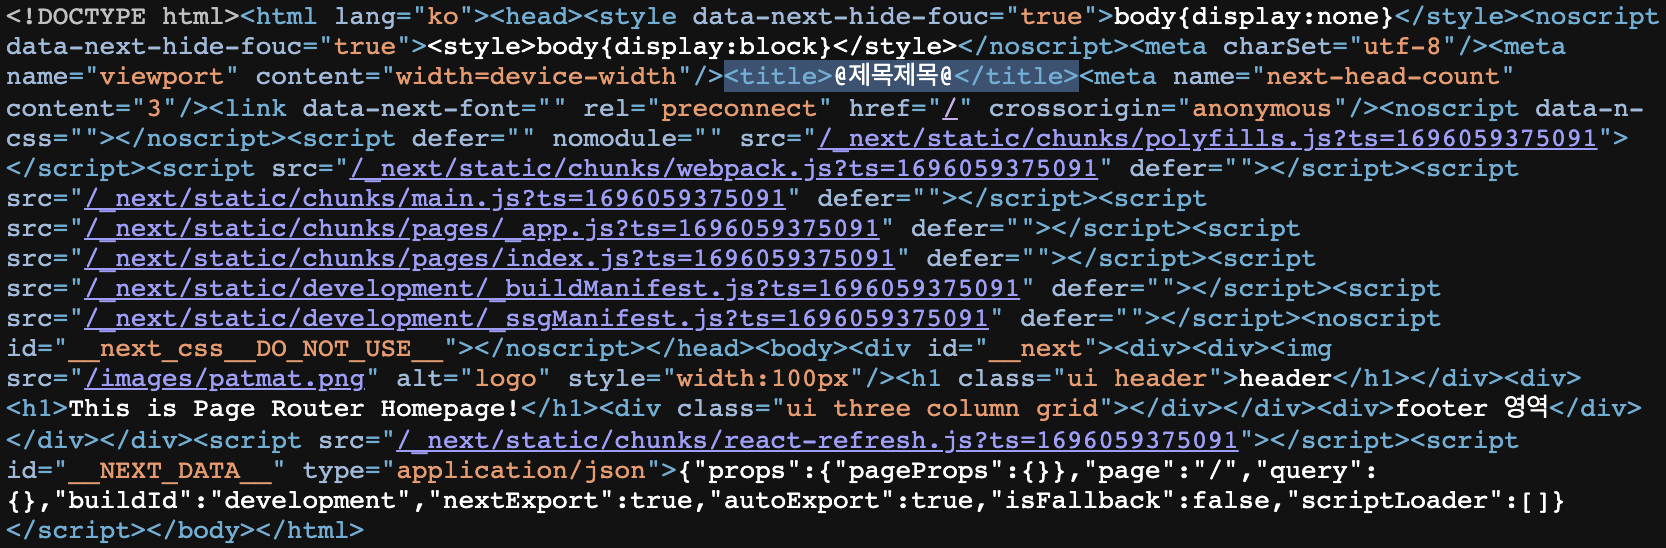
<title>Maybelline Face Studio Master Hi-Light Light Booster Bronzer</title>
<meta name="desc" content="Maybelline Face Studio Master Hi-Light Light Boosting bronzer formula has an expert
balance of shade + shimmer illuminator for natural glow. Skin goes
soft-lit with zero glitz.
		For Best Results: Brush over all shades in palette and gently sweep over
cheekbones, brow bones, and temples, or anywhere light naturally touches
 the face."/>
요청 시 서버에서 데이터를 가져온 후 html을 생성해서 페이지를 보여주기 때문에,
title과 meta에 api 호출하여 받은 데이터값이 들어가 있다.

추가로 JavaScript를 꺼보고 상세화면에 들어가 봤는데, 데이터가 여전히 제대로 표시되고 있다.
3. next/link의 prefetch
<Link href="/dashboard" prefetch={true}>
      Dashboard
</Link>
아이템에 링크를 걸기 위해 next/link의 Link 태그를 사용하였는데, 여기에는 prefetch라는 속성이 있다.
(default=true, production모드에서만 사용 가능)
이 기능 덕분에, 사용자가 보는 화면 영역(viewport) 안에 들어오는 link에 걸려있는 내용들은 모두 preload 된다.

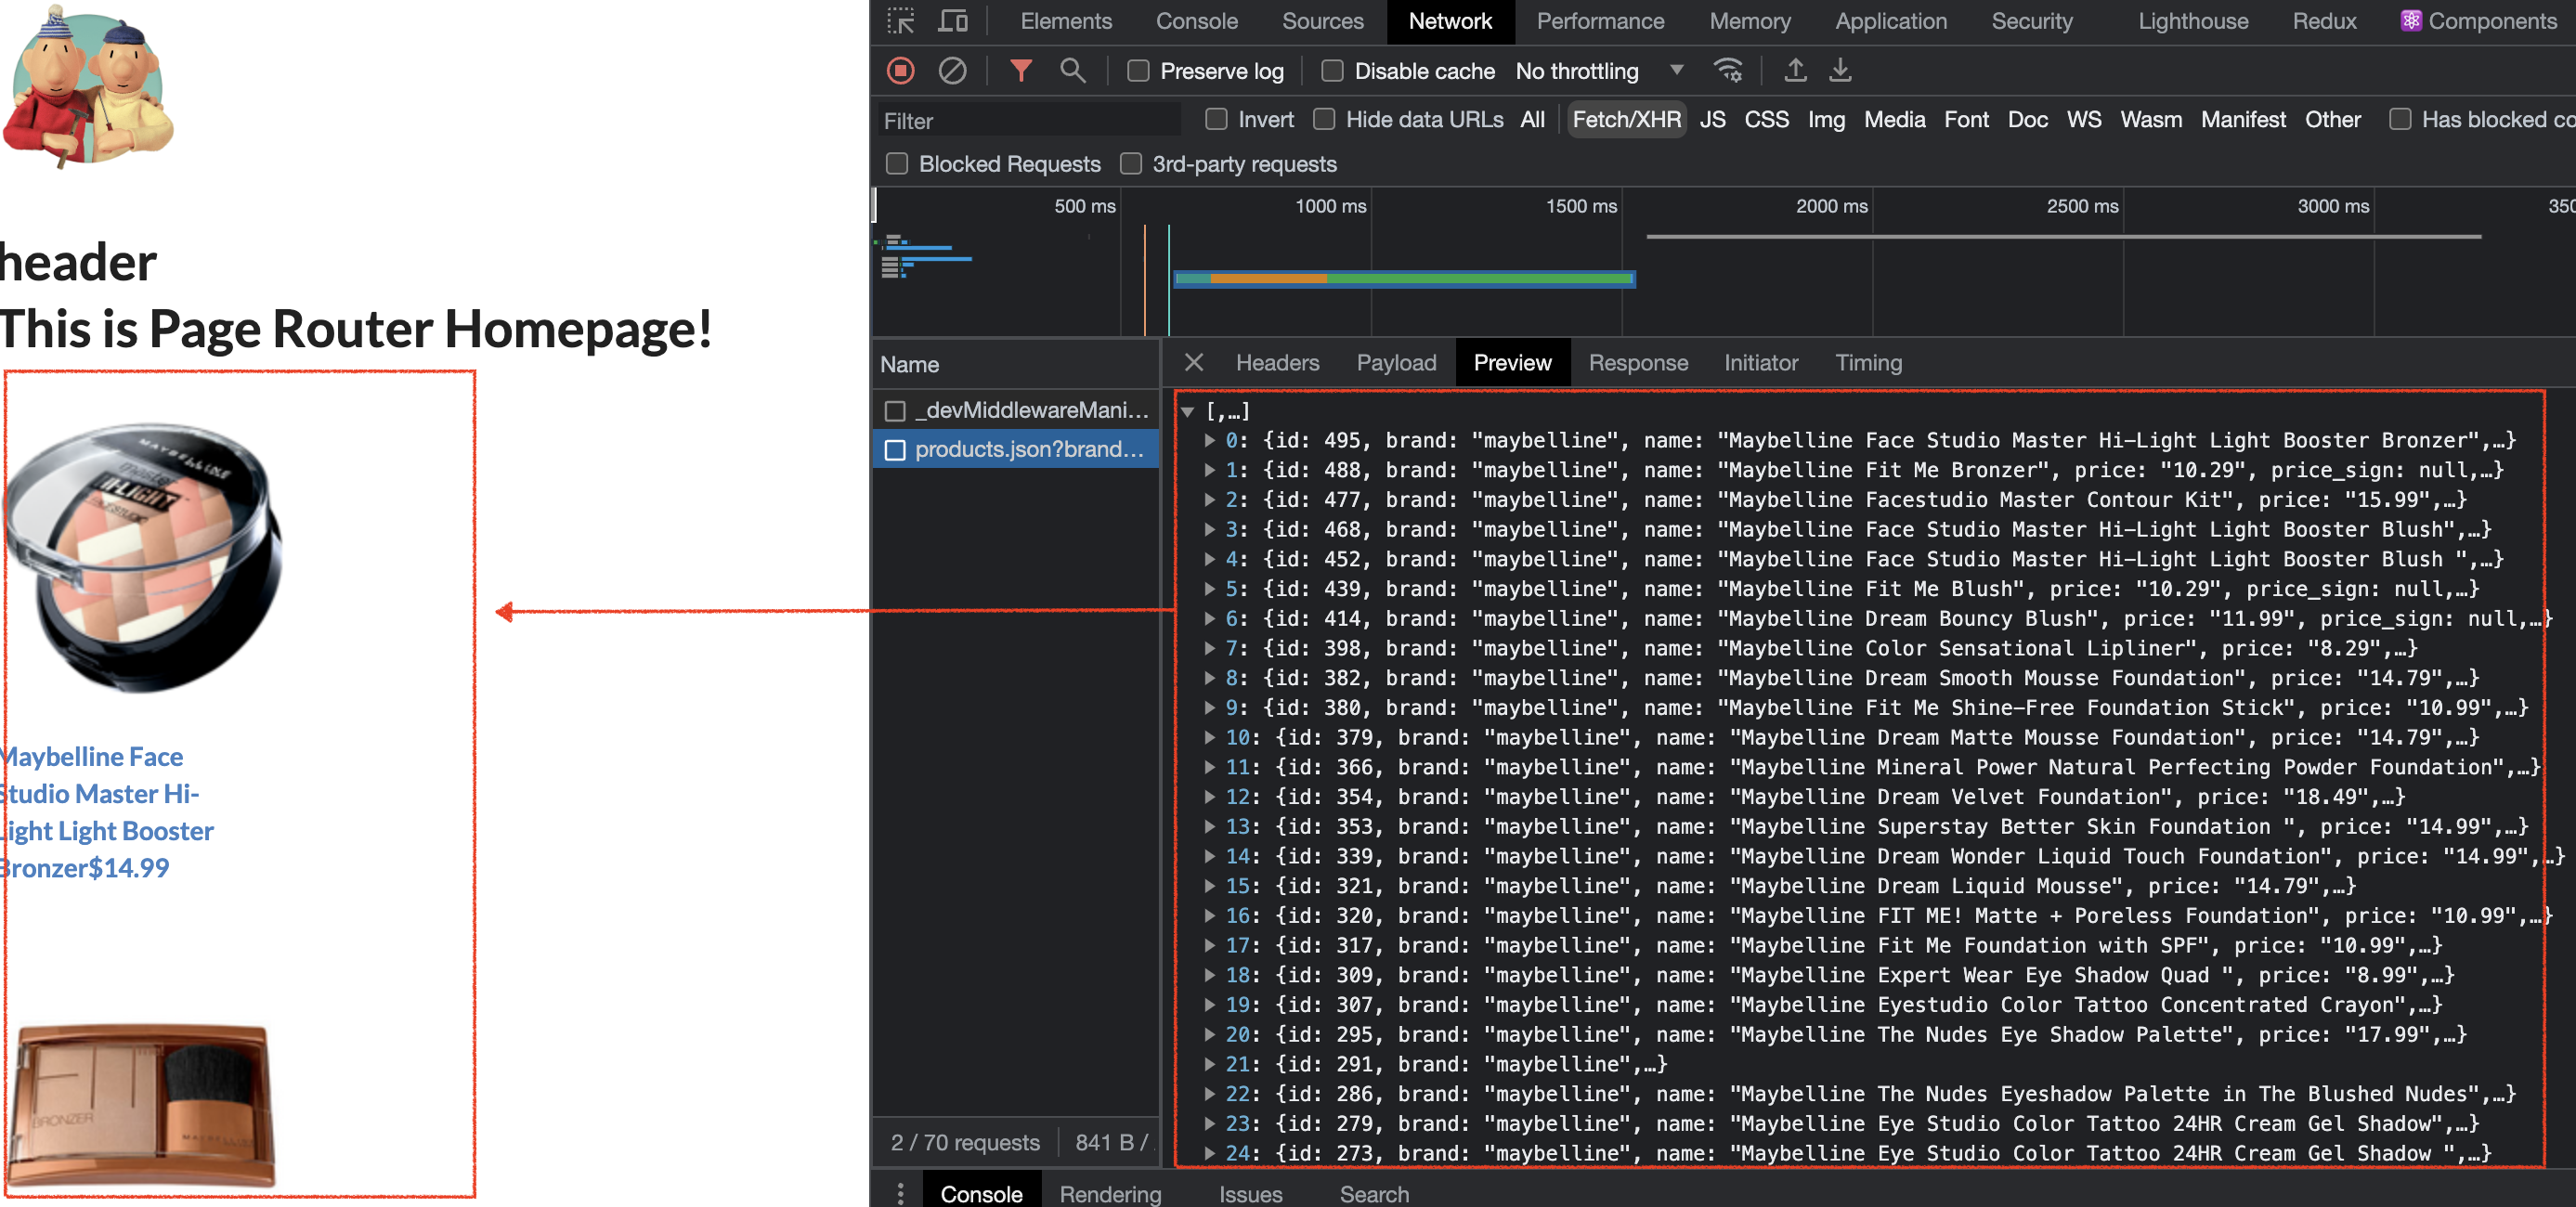
예를 들어, 사용자가 스크롤하면 화면에 들어오는 link들에 대한 페이지들은 사진과 같이 정적파일로 생성된다.
미리 pre-fetch 하여 정적파일로 생성하기 때문에 사용자가 실제로 클릭 시 빠른 화면 전환이 가능해진다.
참고 :
https://www.youtube.com/playlist?list=PLZKTXPmaJk8Lx3TqPlcEAzTL8zcpBz7NP
'🔴 React > Next.js' 카테고리의 다른 글
| isFallback으로 로딩바 보여주기 (0) | 2023.10.04 |
|---|---|
| error 페이지 커스텀 (0) | 2023.10.03 |